
Self-host Penpot
An open-source Figma alternative your whole team designs in, on your own VM.
Shelley handles the setup. About 20 minutes.
Prefer a terminal?
curl -fsSL https://exe-staging.dev/deploy/penpot/prompt.txt | ssh exe.dev new --prompt=/dev/stdinPenpot is an open-source design and prototyping tool, built for the same job as Figma: screens and components, design systems with tokens, clickable prototypes, comments, and an Inspect tab with CSS and SVG for developers. It runs in the browser, and everyone on a file sees each other's cursors and edits live.
On an exe.dev VM it gets HTTPS and a persistent disk with no setup, and your exe.dev login is the only login: share the VM with your team, and everyone signs in to Penpot with one click, no Penpot passwords. Shelley installs Penpot's official Docker Compose stack, pinned to one version, with a small OpenID Connect bridge for the sign-in and nightly backups, and can handle updates later.
What you get#
- Penpot 2.19 running from its official Docker Compose images, pinned, at the VM's private URL.
- Sign-in with exe.dev through Dex, with no Penpot passwords; teammates get an account on their first visit.
- Live multiplayer editing through exe.dev's proxy, for exactly the people you share the VM with.
- Penpot's MCP server and personal access tokens switched on, for AI agents and scripts.
- Nightly backups of the database, uploaded assets and settings, with one checked in a scratch database.
- Everything starts again after a reboot.
What's running, and where
https://my-penpot.exe.xyz/
Penpot, behind your exe.dev login
https://my-penpot.exe.xyz/
Teammates you share the VM with, signed in with their exe.dev login
https://my-penpot.exe.xyz:5556/dex
Dex, the sign-in step; stays behind exe.dev login even if Penpot goes public
Deploy with Shelley#
Click Deploy and Shelley will set up Penpot on a new VM, then check that it works. No config-file wrangling required.
Prefer a terminal?
curl -fsSL \
  https://exe-staging.dev/deploy/penpot/prompt.txt \
  | ssh exe.dev new --prompt=/dev/stdin
What Shelley is told
Set up Penpot on this VM by following the exe.dev recipe at https://exe-staging.dev/deploy/penpot.md?via=deploy from top to bottom.

The recipe's example VM name is my-penpot. This VM's name is the output of `hostname`: use it wherever the recipe writes my-penpot. Skip the step that creates the VM; you are on it.

You are done when all of these are true. Check each one yourself:
- Penpot 2.19 running from its official Docker Compose images, pinned, at the VM's private URL.
- Sign-in with exe.dev through Dex, with no Penpot passwords; teammates get an account on their first visit.
- Live multiplayer editing through exe.dev's proxy, for exactly the people you share the VM with.
- Penpot's MCP server and personal access tokens switched on, for AI agents and scripts.
- Nightly backups of the database, uploaded assets and settings, with one checked in a scratch database.
- Everything starts again after a reboot.

Read the whole recipe, including the closed details. For initial setup,
follow "Install by hand" first, skipping VM creation and SSH: Docker,
the settings file, Dex's settings, the Compose file, starting Penpot,
the backup script and timer, and the backup test. Pulling the images takes a couple of
minutes. The walkthrough at the top is for the owner afterwards.
Work as exedev in ~/penpot. Never overwrite an existing ~/penpot/.env:
it holds the secret key and the database and Dex passwords. Don't
create Penpot accounts (the owner's is made when they first sign in),
set up SMTP or S3, share the VM or make it public, and don't run
Restore or Update.
Verify docker.service is enabled, every service uses unless-stopped,
localhost:8000/readyz answers OK, Dex's issuer check passes, the backup
timer is enabled and the backup test passes. Do not reboot. Finish with the VM's URL and point
the owner to "Make your account" and "Bring your team".

Finish with the URLs I should open.
Also at /deploy/penpot/prompt.txt. The recipe it follows is /deploy/penpot.md.
Make your account#
Open the URL Shelley gives you, like https://my-penpot.exe.xyz/, and
sign in to exe.dev if you're asked. Penpot's login page has one button,
exe.dev: click it. The first time, Penpot asks what to call you (it
suggests your email), then click Create an account. Your Penpot
account is your exe.dev email; there's no password to set.
Penpot puts your files in Drafts in your personal space; make a team for anything you'll share.
Bring your team#
On your computer, share the VM with each teammate, or with your whole exe.dev team:
ssh exe.dev share add my-penpot alice@example.com
ssh exe.dev share add my-penpot team
Ask them to open the same URL and click exe.dev once, which makes their Penpot account. Then bring them into a team:
- In the dashboard, open the team menu at the top left and choose Create new team.
- In the team's Members, click Invite people, enter their emails, pick a role (Viewer, Editor or Admin), and send.
- People who have signed in once are added at once. For anyone who hasn't, the VM sends no email: open Invitations, choose Copy link on their row, and send it to them yourself.
Only people you share the VM with can sign in, so there's no sign-up to
close. To take someone out, run ssh exe.dev share remove my-penpot alice@example.com and remove them from your teams.
Design together#
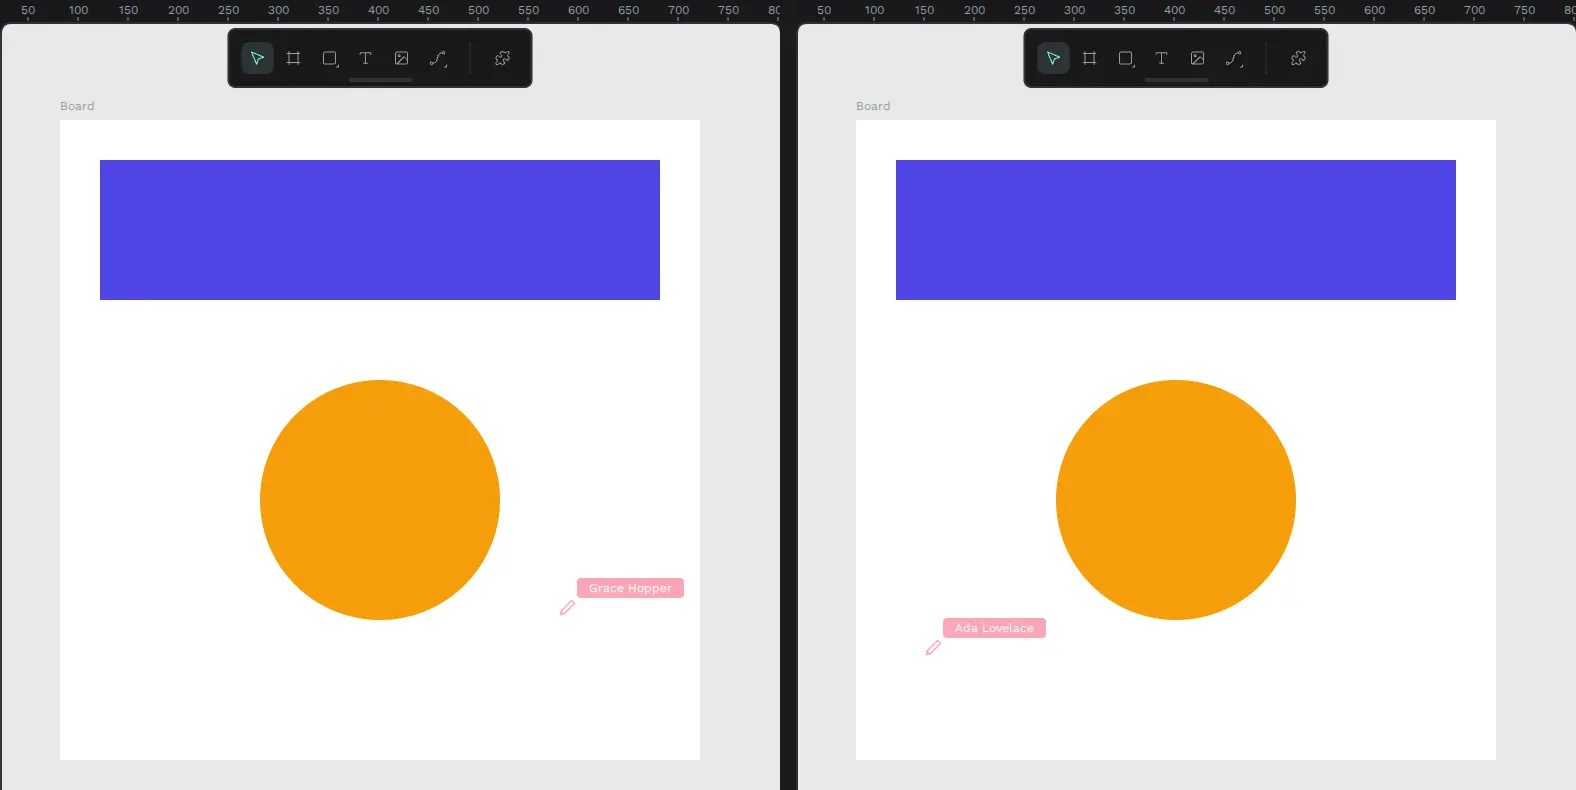
Open a file from the team's project and draw: B for a board, R for a
rectangle, E for an ellipse, T for text. When a teammate opens the
same file, their avatar appears at the top right and their cursor, with
their name, moves across your canvas; every change shows up on both
screens within a second. That runs over a WebSocket through exe.dev's
proxy, with nothing to configure.
To hand a board over to a developer, select it and open Inspect on the right for its CSS, SVG and measurements, or add an export at the bottom of Design and click Export. PNG, SVG and PDF exports are rendered on the VM by Penpot's exporter, in a few seconds each.
Show your work#
In a file, click the share icon at the top right (Share prototypes), pick the pages, and click Get link. Anyone who opens the link sees the prototype in Penpot's viewer, without a Penpot account. Under Manage permissions, choose whether all Penpot users or only team members may comment and inspect.
The link is on your VM, so the visitor still meets exe.dev's login first. You have two choices:
- Share the VM with them (the default).
ssh exe.dev share add my-penpot client@example.comlets that person through; they sign in to exe.dev with that email and the link opens. They could also sign in to Penpot, but would see none of your teams' files unless you invite them. Remove them withshare removeafterwards. Best for a handful of reviewers. - Make Penpot public. Anyone with a link can open it, with no exe.dev account, while signing in still takes your exe.dev login. See Open it to the internet.
Let agents and scripts in#
Penpot's MCP server lets an AI agent such as Claude Code read and change
the file you have open. In Penpot, open Your account → Integrations →
MCP Server, turn it on, and create a key. Copy the server URL; it
looks like https://my-penpot.exe.xyz/mcp/stream?userToken=....
The agent also has to get past exe.dev's login. On your computer, make a VM token for it and send it in exe.dev's own header, which the proxy removes before Penpot sees the request. For Claude Code:
ssh exe.dev ssh-key generate-api-key --vm=my-penpot --label=penpot-mcp
claude mcp add --transport http penpot \
  "https://my-penpot.exe.xyz/mcp/stream?userToken=YOUR-MCP-KEY" \
  --header "X-Exedev-Authorization: Bearer YOUR-VM-TOKEN"
Then, in Penpot, open the design and choose File → MCP Server →
Connect, and keep that tab open while the agent works: its tools
(execute_code, export_shape and others) run in your browser, on the
file you have open.
Scripts can use Penpot's API with a personal access token from
Your account → Integrations. Send it as Penpot's Authorization
header and the VM token as exe.dev's:
curl -H "X-Exedev-Authorization: Bearer YOUR-VM-TOKEN" \
  -H "Authorization: Token YOUR-PENPOT-TOKEN" \
  -H "Accept: application/json" \
  https://my-penpot.exe.xyz/api/rpc/command/get-profile
Without the VM token, exe.dev answers 401 and Penpot never sees the
request. Penpot documents its API at https://my-penpot.exe.xyz/api/main/doc.
Keep your designs safe#
Everything lives in ~/penpot: the PostgreSQL database in postgres,
uploaded images and fonts in assets, and the settings in .env. Every
night a timer dumps the database and saves it with the assets and
settings to ~/penpot/backups, keeping a week.
A backup on the same disk doesn't survive losing the VM. Copy them off regularly; on your computer:
rsync -a my-penpot.exe.xyz:penpot/backups/ ./penpot-backups/
The backups hold Penpot's secret key and passwords: keep them private. For whole-disk copies in your own S3 bucket, see exe.dev's VM backups. To keep a single file outside Penpot, use Download Penpot file (.penpot) from its menu in the dashboard.
To restore, or to check that a backup restores, see Back up and restore, or ask Shelley.
Open it to the internet#
Do this if outsiders must open view links without being added to the VM. On your computer:
ssh exe.dev share set-public my-penpot
That opens port 8000, Penpot itself: view links work for anyone, with no exe.dev account. Signing in doesn't change. Penpot has no passwords or sign-up form here, and its only way in is Dex on port 5556, which exe.dev keeps behind your login and lets through only the people you share the VM with.
What you give up: Penpot's own pages and API now face the internet, so
a flaw in Penpot is reachable by anyone, and updating
promptly matters more. Someone you share remove keeps a Penpot
session that's already open, so remove them from your teams too. ssh exe.dev share set-private my-penpot closes it again.
Email (optional)#
Without email, invitations go nowhere, and you pass invitation links on
by hand (people who have signed in once don't need one). exe.dev's email gateway
only mails you and your team over HTTP, so use a transactional email
service's SMTP settings. Add them to ~/penpot/.env:
PENPOT_SMTP_HOST=smtp.example.com
PENPOT_SMTP_PORT=587
PENPOT_SMTP_TLS=true
PENPOT_SMTP_USERNAME=your-smtp-user
PENPOT_SMTP_PASSWORD=your-smtp-password
PENPOT_SMTP_DEFAULT_FROM=penpot@example.com
PENPOT_SMTP_DEFAULT_REPLY_TO=penpot@example.com
Add enable-smtp to PENPOT_FLAGS in the same file, and pass the
settings to the backend: in ~/penpot/compose.yaml, under
penpot-backend: and its environment:, add a line
PENPOT_SMTP_HOST: ${PENPOT_SMTP_HOST} for each of the seven, then run
docker compose up -d in ~/penpot.
Store assets in S3 (optional)#
Uploaded images and fonts go to ~/penpot/assets on the VM's disk, which
is right for most teams. To keep them in an S3-compatible bucket
instead, set PENPOT_OBJECTS_STORAGE_BACKEND: s3 and the
PENPOT_OBJECTS_STORAGE_S3_* and AWS_* settings for the backend, as in
Penpot's storage docs.
For a bucket of your own, see S3 storage. Assets
already on disk don't move by themselves, so decide before your team
uploads much.
The nuts and bolts#
Happy clicking Deploy? You can stop here. These are the same setup steps Shelley follows, plus the maintenance commands for later. Tested with Penpot 2.19.3, PostgreSQL 15, Valkey 8.1 and Dex 2.46.1 on a default exe.dev VM.
Install by hand
Create a VM#
On your computer (pick another name if my-penpot is taken):
ssh exe.dev new --name=my-penpot
ssh my-penpot.exe.xyz
All remaining installation commands run on the VM, as exedev. They
use hostname, so your VM can have any name.
Get Docker ready#
Enable Docker at boot, or exe.dev's on-demand Docker won't restart Penpot after a reboot:
sudo systemctl enable --now docker.service
systemctl is-enabled docker.service
Expect enabled.
Write the settings#
This makes ~/penpot/.env, readable only by you, with the version, the
address Penpot is served at, its feature flags, and random secrets: the
key Penpot signs sessions with, the database password, and the password
Penpot uses with Dex. It won't overwrite an existing one. The assets
directory belongs to uid 1001, the user Penpot's containers run as.
mkdir -p ~/penpot/backups ~/penpot/assets && cd ~/penpot
sudo chown 1001:1001 assets
if [ ! -f .env ]; then
  (
    umask 077
    cat > .env <<EOF
PENPOT_VERSION=2.19.3
PENPOT_PUBLIC_URI=https://$(hostname).exe.xyz
PENPOT_FLAGS=disable-registration disable-login-with-password enable-login-with-oidc enable-oidc-registration disable-email-verification enable-prepl-server enable-mcp enable-access-tokens
PENPOT_SECRET_KEY=$(python3 -c 'import secrets; print(secrets.token_urlsafe(64))')
PENPOT_DB_PASSWORD=$(openssl rand -hex 24)
PENPOT_OIDC_CLIENT_SECRET=$(openssl rand -hex 32)
EOF
  )
fi
ls -l .env
grep -E '^PENPOT_(VERSION|PUBLIC_URI)=' .env
Expect -rw------- and your VM's https://...exe.xyz address. The flags
turn off Penpot's passwords and sign-up form, let people sign in (and get
an account the first time) through OpenID Connect, skip email
confirmation since there's no mail server, and turn on the command-line
admin tool, the MCP server and personal access tokens.
Configure Dex#
Penpot signs people in through Dex, an OpenID
Connect provider, which takes who they are from exe.dev's
X-ExeDev-Email and X-ExeDev-UserID headers
(Login with exe). Browsers reach Dex at
https://<vm>.exe.xyz:5556/dex, a port exe.dev's proxy only serves
behind your login, even when Penpot itself is public; Penpot's backend
reaches it inside Docker at http://penpot-dex:5556. With one connector
and no approval screen, Dex sends people straight back to Penpot.
cd ~/penpot
cat > dex.yaml <<EOF
# Dex: signs people in to Penpot with their exe.dev login.
issuer: https://$(hostname).exe.xyz:5556/dex
storage:
  type: memory
web:
  http: 0.0.0.0:5556
enablePasswordDB: false
oauth2:
  skipApprovalScreen: true
connectors:
  - type: authproxy
    id: exe
    name: exe.dev
    config:
      userIDHeader: X-ExeDev-UserID
      userHeader: X-ExeDev-Email
      emailHeader: X-ExeDev-Email
staticClients:
  - id: penpot
    name: Penpot
    secretEnv: DEX_CLIENT_SECRET
    redirectURIs:
      - https://$(hostname).exe.xyz/api/auth/oidc/callback
EOF
grep -E 'issuer|callback' dex.yaml
Expect your VM's address twice. Dex keeps nothing worth saving: Penpot has its own sessions, so Dex's in-memory storage is enough.
Write the Compose file#
This is Penpot's official docker-compose.yaml for 2.19, with the
settings read from .env, the data in ~/penpot instead of Docker
volumes, and Penpot on port 8000, the VM's main port. Telemetry is off,
and there's no test mail catcher. Added: Dex, on 127.0.0.1 so only
exe.dev's proxy reaches it from outside, and Penpot's settings for it.
cat > ~/penpot/compose.yaml <<'EOF'
# Penpot's official docker-compose.yaml (2.19), adapted for an exe.dev VM:
# settings come from .env, data lives in ~/penpot, the app answers on port 8000.
name: penpot

x-public-uri: &public-uri
  PENPOT_PUBLIC_URI: ${PENPOT_PUBLIC_URI}
x-flags: &flags
  PENPOT_FLAGS: ${PENPOT_FLAGS}
x-secret-key: &secret-key
  PENPOT_SECRET_KEY: ${PENPOT_SECRET_KEY}
x-body-size: &body-size
  PENPOT_HTTP_SERVER_MAX_BODY_SIZE: 367001600
x-database: &database
  PENPOT_DATABASE_URI: postgresql://penpot-postgres/penpot
  PENPOT_DATABASE_USERNAME: penpot
  PENPOT_DATABASE_PASSWORD: ${PENPOT_DB_PASSWORD}

services:
  penpot-frontend:
    image: penpotapp/frontend:${PENPOT_VERSION}
    restart: unless-stopped
    ports:
      - "8000:8080"
    volumes:
      - ./assets:/opt/data/assets
    depends_on:
      - penpot-backend
      - penpot-admin-console
      - penpot-mcp
      - penpot-exporter
    environment:
      <<: [*flags, *body-size, *public-uri]
      PENPOT_ADMIN_CONSOLE_URI: http://penpot-admin-console:3000
      PENPOT_OIDC_NAME: exe.dev

  penpot-backend:
    image: penpotapp/backend:${PENPOT_VERSION}
    restart: unless-stopped
    volumes:
      - ./assets:/opt/data/assets
    depends_on:
      penpot-postgres:
        condition: service_healthy
      penpot-valkey:
        condition: service_healthy
    environment:
      <<: [*flags, *public-uri, *body-size, *secret-key, *database]
      PENPOT_ADMIN_CONSOLE_URI: http://penpot-admin-console:3000
      PENPOT_REDIS_URI: redis://penpot-valkey/0
      PENPOT_OBJECTS_STORAGE_BACKEND: fs
      PENPOT_OBJECTS_STORAGE_FS_DIRECTORY: /opt/data/assets
      PENPOT_TELEMETRY_ENABLED: "false"
      # Sign-in through Dex: the browser goes to the public address,
      # the backend talks to Dex inside Docker.
      PENPOT_OIDC_CLIENT_ID: penpot
      PENPOT_OIDC_CLIENT_SECRET: ${PENPOT_OIDC_CLIENT_SECRET}
      PENPOT_OIDC_BASE_URI: ${PENPOT_PUBLIC_URI}:5556/dex
      PENPOT_OIDC_AUTH_URI: ${PENPOT_PUBLIC_URI}:5556/dex/auth
      PENPOT_OIDC_TOKEN_URI: http://penpot-dex:5556/dex/token
      PENPOT_OIDC_USER_URI: http://penpot-dex:5556/dex/userinfo
      PENPOT_OIDC_JWKS_URI: http://penpot-dex:5556/dex/keys
      PENPOT_SSRF_ALLOWED_HOSTS: penpot-dex

  penpot-admin-console:
    image: penpotapp/admin-console:${PENPOT_VERSION}
    restart: unless-stopped
    depends_on:
      penpot-postgres:
        condition: service_healthy
    environment:
      <<: [*public-uri, *secret-key, *database]
      PENPOT_INTERNAL_URI: http://penpot-frontend:8080

  penpot-mcp:
    image: penpotapp/mcp:${PENPOT_VERSION}
    restart: unless-stopped

  penpot-exporter:
    image: penpotapp/exporter:${PENPOT_VERSION}
    restart: unless-stopped
    depends_on:
      penpot-valkey:
        condition: service_healthy
    environment:
      <<: [*flags, *secret-key, *public-uri]
      PENPOT_INTERNAL_URI: http://penpot-frontend:8080
      PENPOT_REDIS_URI: redis://penpot-valkey/0

  penpot-dex:
    image: ghcr.io/dexidp/dex:v2.46.1
    restart: unless-stopped
    command: ["dex", "serve", "/etc/dex/dex.yaml"]
    ports:
      - "127.0.0.1:5556:5556"
    volumes:
      - ./dex.yaml:/etc/dex/dex.yaml:ro
    environment:
      DEX_CLIENT_SECRET: ${PENPOT_OIDC_CLIENT_SECRET}

  penpot-postgres:
    image: postgres:15
    restart: unless-stopped
    stop_signal: SIGINT
    healthcheck:
      test: ["CMD-SHELL", "pg_isready -U penpot"]
      interval: 2s
      timeout: 10s
      retries: 5
      start_period: 2s
    volumes:
      - ./postgres:/var/lib/postgresql/data
    environment:
      POSTGRES_INITDB_ARGS: --data-checksums
      POSTGRES_DB: penpot
      POSTGRES_USER: penpot
      POSTGRES_PASSWORD: ${PENPOT_DB_PASSWORD}

  penpot-valkey:
    image: valkey/valkey:8.1
    restart: unless-stopped
    healthcheck:
      test: ["CMD-SHELL", "valkey-cli ping | grep PONG"]
      interval: 1s
      timeout: 3s
      retries: 5
      start_period: 3s
    environment:
      VALKEY_EXTRA_FLAGS: --maxmemory 128mb --maxmemory-policy volatile-lfu
EOF
cd ~/penpot && docker compose config --quiet && echo compose ok
Expect compose ok.
Start Penpot#
The first start pulls about 6.5 GB of images (a minute or two), then the backend creates its database:
cd ~/penpot
docker compose up -d
until curl -fs -o /dev/null localhost:8000/readyz; do sleep 3; done
curl -s localhost:8000/readyz; echo
curl -s localhost:8000/js/config.js | grep -o 'penpotPublicURI[^;]*'
curl -s localhost:5556/dex/.well-known/openid-configuration | grep '"issuer"'
docker compose logs penpot-backend | grep -c 'provider initialized'
docker compose ps --format '{{.Service}}: {{.Status}}'
Expect OK, your VM's address, Dex's issuer (your address with
:5556/dex), 1, and eight services Up (Postgres and Valkey
healthy).
Set up nightly backups#
The backup dumps the database with pg_dump while Penpot runs, and packs
it with the assets and settings. It runs as root because the assets
belong to the containers' user.
cat > ~/penpot/backup.sh <<'EOF'
#!/bin/bash
# Back up Penpot: a dump of the PostgreSQL database, the uploaded assets,
# and the settings (.env holds the secret key and passwords).
# Run with sudo.
set -euo pipefail
cd /home/exedev/penpot
stamp=$(date -u +%Y%m%d-%H%M%S)
work=$(mktemp -d)
trap 'rm -rf "$work"' EXIT
docker compose exec -T penpot-postgres pg_dump -U penpot -Fc penpot > "$work/penpot.dump"
cp -a assets compose.yaml .env dex.yaml "$work/"
umask 077
tar -C "$work" -czf "backups/penpot-$stamp.tar.gz" penpot.dump assets compose.yaml .env dex.yaml
chown exedev: "backups/penpot-$stamp.tar.gz"
find backups -name 'penpot-*.tar.gz' -mtime +6 -delete
echo "backups/penpot-$stamp.tar.gz"
EOF
chmod 755 ~/penpot/backup.sh
Schedule it for 03:30 UTC (or so), then take a first backup:
sudo tee /etc/systemd/system/penpot-backup.service >/dev/null <<'EOF'
[Unit]
Description=Back up Penpot

[Service]
Type=oneshot
ExecStart=/home/exedev/penpot/backup.sh
EOF
sudo tee /etc/systemd/system/penpot-backup.timer >/dev/null <<'EOF'
[Unit]
Description=Back up Penpot every night

[Timer]
OnCalendar=*-*-* 03:30:00
RandomizedDelaySec=30m
Persistent=true

[Install]
WantedBy=timers.target
EOF
sudo systemctl daemon-reload
sudo systemctl enable --now penpot-backup.timer
sudo systemctl start penpot-backup.service
systemctl list-timers penpot-backup.timer
ls -l ~/penpot/backups
Check that the timer has a next run and there's a penpot-*.tar.gz
readable only by you. For failures: journalctl -u penpot-backup.
Test a backup#
Unpack the newest backup into a scratch directory, restore its dump into a throwaway PostgreSQL, and count what's in it, without touching the running Penpot:
latest=$(ls -1t ~/penpot/backups/penpot-*.tar.gz | head -n 1)
mkdir /tmp/penpot-restore-test
tar -C /tmp/penpot-restore-test -xzf "$latest"
docker run -d --rm --name penpot-restore-test -e POSTGRES_PASSWORD=test \
  -v /tmp/penpot-restore-test/penpot.dump:/penpot.dump:ro postgres:15
until docker exec penpot-restore-test psql -U postgres -h 127.0.0.1 -c 'SELECT 1' >/dev/null 2>&1; do sleep 2; done
docker exec penpot-restore-test pg_restore -U postgres -d postgres --create --no-owner /penpot.dump
docker exec penpot-restore-test psql -U postgres -d penpot -tAc \
  "SELECT (SELECT count(*) FROM profile) || ' profiles, ' || (SELECT count(*) FROM file WHERE deleted_at IS NULL) || ' files'"
sudo find /tmp/penpot-restore-test/assets -type f | wc -l
docker stop penpot-restore-test
sudo rm -rf /tmp/penpot-restore-test
Expect a container ID, then counts (0 profiles, 0 files and 0 on a
new install), then penpot-restore-test.
Installation done. Leave sharing to the owner; continue with Make your account.
Back up and restore
On the VM, sudo ~/penpot/backup.sh makes an extra backup and prints its
path. Copy backups off the VM as in
Keep your designs safe.
Restore#
This replaces everything in Penpot with the backup: work saved since is lost, and everyone is signed out. Use your backup's actual filename below.
On the same VM, take a fresh backup, stop Penpot, keep the current data aside, and load the backup into a new, empty database:
cd ~/penpot
sudo ./backup.sh
docker compose down
stamp=$(date -u +%Y%m%d-%H%M%S)
sudo mv postgres "postgres.before-restore-$stamp"
sudo mv assets "assets.before-restore-$stamp"
mkdir /tmp/penpot-restore
sudo tar -C /tmp/penpot-restore -xzf backups/penpot-20261121-033012.tar.gz
sudo mv /tmp/penpot-restore/assets assets
docker compose up -d penpot-postgres
until docker compose exec -T penpot-postgres pg_isready -h 127.0.0.1 -U penpot; do sleep 2; done
docker compose exec -T penpot-postgres pg_restore -U penpot -d penpot --no-owner < /tmp/penpot-restore/penpot.dump
sudo rm -rf /tmp/penpot-restore
docker compose up -d
until curl -fs -o /dev/null localhost:8000/readyz; do sleep 3; done; curl -s localhost:8000/readyz; echo
Expect no response a time or two while the new database initializes,
then accepting connections and OK. Sign in and check your files. Keep
the *.before-restore-* directories until you're sure.
On a new VM, follow Get Docker ready, then copy the backup over; on your computer:
scp penpot-20261121-033012.tar.gz my-penpot.exe.xyz:
On the VM, unpack all of it, settings included. If the VM's name changed,
the sed lines point PENPOT_PUBLIC_URI and Dex at the new exe.xyz
name:
mkdir -p ~/penpot/backups && cd ~/penpot
sudo tar -C ~/penpot -xzf ~/penpot-20261121-033012.tar.gz
sudo chown exedev: compose.yaml .env dex.yaml
sed -i "s|^PENPOT_PUBLIC_URI=https://[a-z0-9-]*\.exe\.xyz$|PENPOT_PUBLIC_URI=https://$(hostname).exe.xyz|" .env
sed -i "s|https://[a-z0-9-]*\.exe\.xyz|https://$(hostname).exe.xyz|" dex.yaml
docker compose up -d penpot-postgres
until docker compose exec -T penpot-postgres pg_isready -h 127.0.0.1 -U penpot; do sleep 2; done
docker compose exec -T penpot-postgres pg_restore -U penpot -d penpot --no-owner < penpot.dump
sudo rm penpot.dump
docker compose up -d
until curl -fs -o /dev/null localhost:8000/readyz; do sleep 3; done; curl -s localhost:8000/readyz; echo
Then do Set up nightly backups and share the VM with your team again. Accounts, teams, files and uploads come back, and everyone signs in with exe.dev as before. MCP keys and access tokens keep working too, since the secret key came along.
Update Penpot
Read the release notes for every version between yours and the new one. Penpot advises updating one minor version at a time (2.19 to 2.20, then 2.21), since each can migrate the database. Check the notes, too, for changes to the official Compose file that yours needs, such as new services.
On the VM, back up, move the version, and restart. Replace 2.20.0 with
the version you want:
cd ~/penpot
sudo ./backup.sh
sed -i 's/^PENPOT_VERSION=.*/PENPOT_VERSION=2.20.0/' .env
docker compose pull
docker compose up -d
until curl -fs -o /dev/null localhost:8000/readyz; do sleep 3; done; curl -s localhost:8000/readyz; echo
docker compose logs penpot-backend | grep -m1 -o 'version=[^ ]*'
docker image prune -f
Ask everyone to reload Penpot in their browser. Dex stays on the version
in compose.yaml; to move it, change its tag there, check Dex's
release notes, and run
docker compose up -d penpot-dex. To roll back,
restore the backup with the old version in .env: changing
the version alone won't undo database migrations.
Something not working?
On the VM:
cd ~/penpot
docker compose ps
docker compose logs --tail=100 penpot-backend
- A script or agent gets
401: that's exe.dev's login, not Penpot. Send a VM token inX-Exedev-Authorization, as in Let agents and scripts in. - The API answers as
Anonymous User: the VM token got you past exe.dev, but Penpot needs its own token too:Authorization: Token .... - Clicking exe.dev ends in an error page from Dex, or back on the
login page: the address in
.env(PENPOT_PUBLIC_URI) and both addresses index.yamlmust be your VM's, exactly. Fix them, thendocker compose up -d --force-recreate penpot-dex penpot-backend.docker compose logs --tail=50 penpot-dex penpot-backendshows which step failed. - Dex says
required HTTP header X-ExeDev-Email is not set: a request reached Dex without going through exe.dev's proxy. Usehttps://<vm>.exe.xyz:5556, never a direct address. - A teammate can't sign in at all: they need the VM shared with them
(
ssh exe.dev share add my-penpot them@example.com), and to sign in to exe.dev with that same email. - An invitation email never arrives: there's no mail server. Use Copy link in the team's Invitations, or set up email.
- Penpot loads forever:
PENPOT_PUBLIC_URIin.envmust match the address in your browser. Fix it (anddex.yaml), thendocker compose up -d --force-recreate. - Exports fail or hang: check
docker compose logs --tail=100 penpot-exporter. It runs a headless browser that needs about 1 GB of memory while exporting. - No live cursors or edits from others: reload the file. If it
persists, look for failed
/ws/notificationsrequests in the browser's developer tools and errors in the backend log. - Down after a reboot: run
sudo systemctl enable --now docker.service.
Frequently asked questions#
Is Penpot a good Figma alternative?
For a lot of teams, yes. Penpot has boards, components and variants, flex and grid layout, design tokens, prototypes, comments, live multiplayer editing, and an Inspect tab that hands developers CSS, SVG and HTML. It works in the browser and stores designs as open SVG-based data you own. Figma files don't open in it directly, so moving an existing design system takes work.
How does the exe.dev sign-in work?
Penpot signs people in with any OpenID Connect provider, and exe.dev isn't one, so Dex stands in. Its authproxy connector believes the X-ExeDev-Email and X-ExeDev-UserID headers, which exe.dev's proxy sets on every request to a private port and overwrites if a browser sends its own. Dex listens on port 5556 on 127.0.0.1, which exe.dev's proxy only serves behind your login, so from outside, those headers always come from exe.dev. Penpot's passwords and sign-up form are switched off. A program on the VM itself could still reach Dex directly and sign in as anyone, as with any app that trusts its proxy; it could read the database anyway.
Can a client look at a design without an account?
Yes, with a view link from Share prototypes: it opens the prototype without a Penpot account. They still have to get past exe.dev's login, so either share the VM with their email or make Penpot public; signing in stays limited to people you share the VM with either way. See Show your work.
How much memory does Penpot need?
On our test VM it used about 2.7 GB idle, most of it the backend's Java process (1.4 GB) and the exporter's headless browser (0.7 GB, 0.9 GB while exporting). exe.dev's default 8 GB VM is plenty for a team; the images take about 6.5 GB of disk.
Can Claude or another AI agent work in my Penpot files?
Penpot ships an MCP server that lets an agent read and change the file you have open, and it's switched on here. Your agent needs a Penpot MCP key and, since the VM is private, an exe.dev VM token. We checked that an agent can connect and list its tools; see Let agents and scripts in.
How much does it cost?
Penpot is free and open source (MPL-2.0), with no seat limits. You pay for your exe.dev plan. Give it its own VM: it needs a few gigabytes of memory.
Published Nov 21, 2026 · Updated Nov 21, 2026 · tested end to end Nov 21, 2026 · Markdown · manifest.json · Something wrong? Tell us